A few years ago I put together a bash script for macOS leveraging dockutil to standardize Dock layout and some miscellaneous Finder settings (screenshot save location, default saving files to local instead of iCloud, prevent creation of .DS_Store, etc).
The script did what I needed it to but lacked any sort of logging and required dockutil to already be installed on the machine.
Fast forward to this past weekend when I was spinning around in my office chair avoiding working on my Unreal project (you can read more about that here) and I realized this script could probably use some TLC.
What’s new?
Well, for starters, logging has been added with some neat emojis.
I also added support for Installomator-based dockutil installation (was just a check previously), cleaned up some logic, removed deprecated macOS commands, added a DEP check, and script timer.
Nothing world changing, but it’s a whole lot prettier and I plan on expanding its feature set over the next few months.
Today’s release of Jamf Pro 11.1.0 includes the much anticipated release of Jamf Remote Assist.
This is a feature I’ve been looking forward to since the deprecation announcement for Jamf Remote. I think having some kind of built-in remote control functionality is a must for a MDM in this day and age.
The new tool is a little on the bare & buggy side, but I have a feeling that it will be something that the engineering team at Jamf will be giving some extra love to in the coming months.
Recently the need arose for our techs to be able to easily set device names. I wanted a script that I could deploy via Self-Service (or during enrollment) that would prompt the user and change the machine’s name based on the input.
swiftDialog was the obvious framework choice, but before I reinvented the wheel I wanted to see if someone else had already done the hard work.
Turns out, they had! I love when that happens.
Adam Codega has a great script that does exactly what I needed it to.
I have to call the icon out because it’s such an awesome touch. The script detects whether the device is a laptop or desktop and displays the appropriate icon. I’m a sucker for details like that!
I modified some of the GUI elements and added a bit of code to display the serial number to make it easier for the individual who is setting the name of the machine (since our naming convention includes the serial number).
I also added a Jamf Recon command to update the computer’s inventory record. This is completely optional, and if you don’t use Jamf you can easily remove that bit.
#!/bin/bash

# Credit to https://github.com/acodega

# Get serial number using system_profiler
serial_number=$(system_profiler SPHardwareDataType | awk '/Serial/ {print $4}')

# Displays icon based on type of device
hwType=$(/usr/sbin/system_profiler SPHardwareDataType | grep "Model Identifier" | grep "Book")
if [ "$hwType" != "" ]; then
  icon="SF=laptopcomputer"
else
  icon="SF=desktopcomputer"
fi

dialogApp="/usr/local/bin/dialog"

title="Computer Name Prompter"
message="Please set the name of this device. \n\n Department Code + Serial Number + L/W (Laptop or Workstation). \n\n Your computer's serial number is: $serial_number"

dialogCMD="$dialogApp -p --title \"$title\" \
--icon \"$icon\" \
--message \"$message\" \
--messagefont "name=Arial,size=15" \
--small \
--button1text "Set" \
--button2 \
--ontop \
--moveable \
--textfield \"Computer Name\""

computerName=$(eval "$dialogCMD" | awk -F " : " '{print $NF}')

if [[ $computerName == "" ]]; then
  echo "Aborting"
  exit 1
fi

scutil --set HostName "$computerName"
scutil --set LocalHostName "$computerName"
scutil --set ComputerName "$computerName"

# Run Jamf binary command to update inventory record with new computer name
/usr/local/bin/jamf recon -setComputerName "$computerName"

# Echo new computer name for logging
echo "Computer Name is now $computerName"

exit 0
Very happy to announce a long overdue update to my severely neglected Minecraft resource pack – Default Dark Mode Extended.
This pack adds ‘dark mode’ GUI variants for a number of Forge mods (entire list of supported mods can be found: here)
It was inspired by and intended to be used alongside nebuIr’s Default Dark Mode resource pack. All credit for color pallet and design goes to nebuIr.
Since this pack only replaces GUI’s, it can be used with other texture packs!
It was created for Minecraft 1.12.2, but can likely be used on other versions. Your mileage may vary. You may create an issue on Github to request a port to a specific version of Minecraft and I’ll see what I can do.
Next release will be a HUGE one featuring the likes of Futurepack, Galacticraft, Mekanism, OpenComputers, and RFTools. I’m already around 30% done, so I should have it out in the month or so, but don’t quote me!
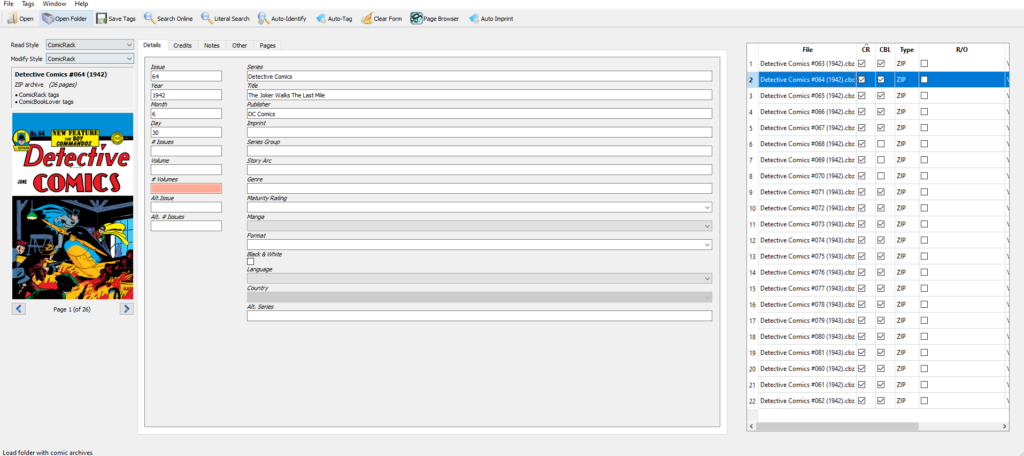
I have a large (like, hundreds of GB’s) digital library of comic books that I’ve acquired over a decade of hoarding. Obviously, content has come from all kinds of different sources over the years and so the quality of the metadata ranges wildly, from very detailed to non-existent, from file to file.
It’s an extremely powerful free and open-source program designed for organizing and managing digital comic book collections.
The program provides a set of tools & GUI that allow users to view and edit the metadata of comic book files in various formats such as CBZ, CBR, CB7, and PDF.
It can automatically identify and tag comic books with metadata such as the title, author, publisher, and issue number by scanning Comic Vine’s online database. It also allows users to edit and add their own metadata, such as custom tags, summaries, and notes.
In addition to managing metadata, ComicTagger also has tools for organizing and renaming files, creating custom cover images, and exporting lists of comics. It also offers a batch processing feature (via Auto-Tag) that allows users to apply changes to multiple files at once.
This is especially helpful for removing unnecessary information from files names to ensure that you get the best match when looking for metadata.
On the subject of metadata – while not strictly necessary, it’s recommended by the developers to get a personal Comic Vine API key and use that when tagging with ComicTagger.
This is because Comic Vine implements a per-key limit on API access rates. Since the default application key is shared, it may already be exhausted by other users.
To obtain a Comic Vine API key, you will need to follow these steps:
In the API section, click on the “Get An API Key” button.
You will be asked to provide some information about the intended use of the API key, such as the name of your application and its website or description. Fill in the required information and click the “Submit” button.
Once approved, copy & paste your API key into ComicTagger via File > Settings > Comic Vine > Comic Vine API Key
It’s important to note that Comic Vine limits the number of requests that can be made using the API key. Make sure to read their terms of service and use the API responsibly.
You can read more about ComicTagger and its features here!
In a previous post I went over how I use Docker Compose to build out and manage my self-hosted services. In this post, I want to introduce you to one of my favorites: Komga!
Komga is an open-source comic book/manga web server that allows you organize and serve all of your CBZ/CBR/EPUB’s in one place! As I mentioned above, it can be run in Docker so you can basically run it on anything. It has an integrated web reader and offers an API that can be used with many popular comic/manga readers.
Why do I like it so much, you ask?
Well, a few years ago I was running Ubooquity to host my comic library and while it worked, there were a lot things I wasn’t happy with: